How to Make a Rosary With Beads: Materials, Layout and Assembly
Published How we research
Making a rosary by hand is a meaningful craft project for many people, whether as a personal devotion item or a gift. The basic structure is consistent: a crucifix, a center piece, a short strand leading up to it, and a loop of five groups of ten smaller beads separated by larger ones. This guide explains the layout, the materials that hold up well to frequent handling, two common assembly methods, and how to check the finished piece, so you can build one with confidence. Traditions and prayer practices vary, so follow the pattern that matches your own.
Products from this article
The highest-scoring picks from the buying guides this article links to. Scores are our editorial assessment, not customer ratings.
As an Amazon Associate we earn from qualifying purchases. This does not change our picks. Affiliate disclosure
+ LotFancy is a familiar craft brand for consistent wood supplies
From our guide: Best Wooden Beads for Crafts and Jewelry
+ 304 stainless steel does not rely on plating, so there is no coating to wear through
From our guide: Best Head Pins and Eye Pins for Earrings and Bead Dangles
+ Smooth jaws help avoid scratches on plated and soft wire
From our guide: Best Round Nose Pliers for Loops and Wire Wrapping
+ Micro-fused braided line resists fraying from sharp crystal edges
From our guide: Best Bead Stringing Materials
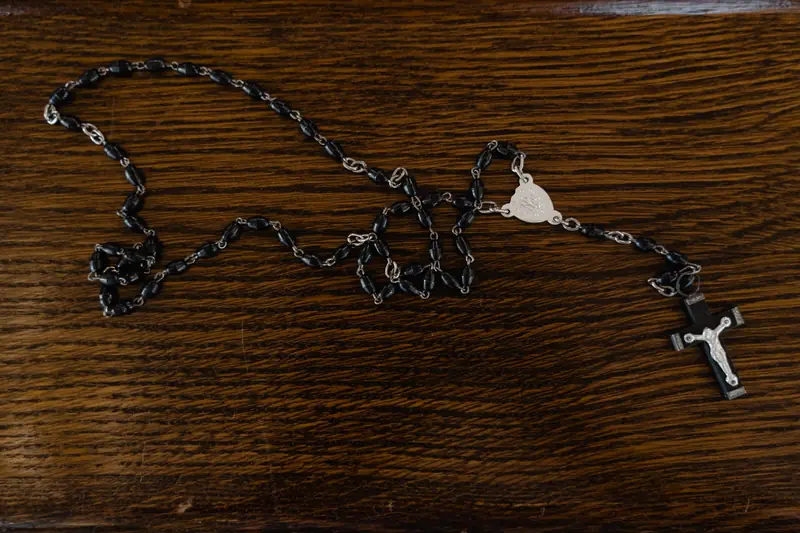
Understand the layout before you start
A traditional Catholic rosary is built from a crucifix, a center medal, and then beads arranged in a set pattern. From the center piece, a short tail runs to the crucifix with one larger bead, followed by three smaller beads and another larger bead. The main loop has five decades, each made of ten smaller beads, with a larger bead between each decade. Counting the beads carefully matters, since the pattern is part of the use.
Some rosary traditions and other prayer bead strands have different counts and arrangements, so confirm the pattern you need before buying supplies. If you are making one for a particular person or community, it can help to ask what they prefer. The details below describe the common five-decade pattern and the general method, which you can adapt.
Choose beads and materials that last
Rosaries are handled often, so durability matters more than on decorative jewelry. Popular choices include wood, glass, crystal, pearl and gemstone beads. Smaller beads are commonly around six to eight millimeters, with the larger bead between decades a couple of millimeters bigger. Choose beads with smooth holes that will not chafe the cord, and aim for a consistent size across the decades.
You also need a crucifix, a center piece, and a way to connect the beads. Strong nylon cord or silk cord is traditional and gives a flexible feel, while a chain-link method uses eye pins and links for a stronger connection. Pick metal findings that match in color, and consider plated or sterling options if you want them to resist wear.
Prepare your tools and workspace
For the cord method you need cord, a beading needle if the cord is thin, scissors, and a clamp or tape to hold the end. For the chain method you need eye pins, round-nose pliers to form loops, and wire cutters. Work on a bead mat or tray so the large and small beads stay separated, and count each decade into a small dish before you begin.
Cutting pin wire can send small pieces flying, so cover the cutting end with your fingers or wear safety glasses. Take your time on the loops, because uneven loops can open under use. A well-lit workspace helps you see the tiny holes and keep an accurate count.
Assemble with knotted cord
Cut a long length of cord, since knots take up more material than you expect. Starting at the center piece, attach the cord with a secure knot and string the first section toward the crucifix, adding the larger and smaller beads in order. Tie a knot after each bead if you want the traditional look, which also keeps the beads from sliding and protects the strand if it breaks.
After the crucifix section, return to the center piece and string the main loop in the five-decade pattern. When you reach the end, tie a strong square knot or a surgeon's knot to close the loop, then trim the tails and seal them with a small dab of clear glue. Let the glue dry fully before handling the piece, and follow the glue's directions for ventilation.
Assemble with chain links
Slide a bead onto an eye pin, trim the wire to about three eighths of an inch above the bead, and bend a loop with round-nose pliers. Connect each loop to the next link, with a second loop on the opposite end, to build a continuous chain of beads. This method is stronger than cord because each connection is metal, and a broken link can be replaced without redoing the whole piece.
Close each loop completely so wire ends meet cleanly, and check each one by pulling gently. Use a consistent loop size so the chain looks even. If you plan to make several, build the decades first, then connect them to the center piece and crucifix at the end.
Check the finished piece and care for it
Run the rosary through your fingers slowly and count each decade again, then check every knot or loop for stability. Pay attention to the join between the crucifix and the first bead, since that connection takes the most stress. If something feels weak, reinforce it before gifting.
For care, store the rosary in a small pouch or case to prevent tangles, wipe it with a soft dry cloth, and avoid exposing natural materials to harsh chemicals. Wooden beads can be wiped lightly and left to dry. A thoughtfully made rosary can last for many years with gentle use.
Gift and presentation tips
A handmade rosary is often given for a milestone such as a first communion, confirmation or baptism, or simply as a thoughtful personal gift. If you are making one for someone else, consider their preferences for bead color, material and size. A simple, sturdy design is usually better than an elaborate one, because the piece will be handled often.
Presenting it well adds to the meaning. A small fabric pouch, a plain box or a simple card with a short note works nicely. Make sure the knots or loops are fully secure before you wrap it. If you are unsure about customs or details, asking a family member, a parish contact or the recipient is a respectful way to get it right.
Popular right now
- Seed Bead Size ChartArticle
- Choosing Beading WireArticle
- Best Jewelry Making Travel Cases for Crafting AnywhereBuying guide
- Best Bead Reamers for Enlarging and Smoothing Bead HolesBuying guide
- Best Bead Spinners for Fast Seed Bead StringingBuying guide
- Best Crimp Beads and Crimp Tubes for Secure BeadingBuying guide
Based on the last 28 days of search and visitor data.